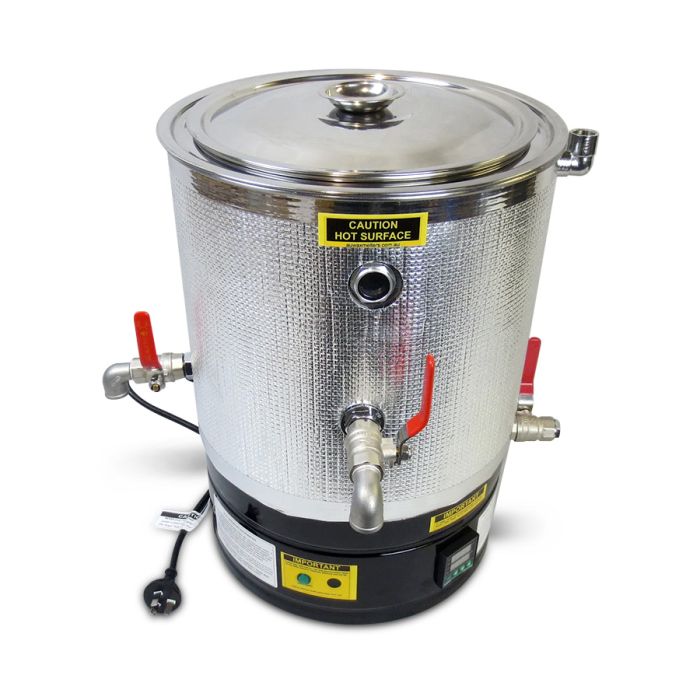
Features
- The fastest heat up times per volume available on the market.
- Digital Thermostat Controller provides excellent temperature control.
- Silver Thermal body insulator wrap – the insulator wrap significantly improves heat retention, significantly reduces power consumption and is safe to touch.
- Production time savings.
- Improved product quality & consistency.
- Safe and easy to use.
- Detailed user instructions.
- Easy to maintain.
- For use on a domestic 10 amp power point with safety circuit breaker switch.
- Serviceable.
Specifications
- 15kg internal product chamber.
- 11L water jacket.
- Overall dimensions: H46cm x W37cm.
- Internal product chamber dimensions: H25cm x W27cm
- Product tap heights 22cm & 27cm.
- Bottom Internal tap sits approximately 1cm from the chamber base.
- Top & middle taps are the product taps to the chamber, bottom lowest tap on right is to empty the water jacket.
- Water jacket thermostat temperature range – 20-100℃
- Cold start product to 85℃ – approximately 90 minutes.
- Water jacket drain tap to empty water jacket if required – (position is the lowest tap on the right looking from the front of the unit )
- Units will have some unavoidable marks from the manufacturing processes.
The Basics
- First fill the water jacket with demineralised water – demineralised water is a low cost product that can be purchased at supermarkets and hardware stores for around $4 for 5 litres, once filled the demineralised water is left in the unit for it’s entire life just topped up as required, demineralised water protects internal components extending unit life and improving serviceability for many years.
- Plug into power.
- Heat unit to desired temperature.
- Add product and heat product to required temperature.
- Allow the product to separate/settle and stabilised at the required temperature.
- Drain off Products.
Reducing / Cleaning Straight Capping’s
Reducing and cleaning straight capping’s is essentially the same process as the cleaning wax guide below with one difference, clean water should not be added to the chamber as wax capping’s have enough honey to melt and separate between the bottom layer of honey and the top layer of clean beeswax.
The honey recovered from the capping’s is therefore just heated honey and not honey rich water and it has many uses, it is commonly used for sauces, cooking and making mead (fermentation).
Note: For pressed wax capping’s, please use the guide below.
Cleaning Wax – Dirty wax capping’s, old foundation and wax from previous cleans.
Add water first to the chamber, fill to just above the top tap outlet.
Add wax capping’s, old foundation and wax from previous cleans to the chamber.
Set thermostat temperature to between 70-80℃ for the water jacket. Do not exceed 80c as at these higher temperatures the wax will discolour.
To achieve best results, a slower melt time is preferred. Ideally run the unit at a lower temperature (70-80℃ for usually 8-10 hours for best results), this will allow the wax to just melt and gravity to separate the liquid layers at different densities. Water/Honey is heavier than wax, therefore wax will float to the top of the chamber. Any debris will tend to sit within the water or just below the wax line (between water and wax). Therefore DO NOT stir the contents after it has melted and separated.
Once everything has melted, separated and settled (Usually 8-10 hours for best results), before opening the taps, if there is any debris floating on top of the wax, carefully skim the debris off – taking care not to stir the contents of the chamber. Open the lowest chamber tap to drain off the honey rich water until you see the colour/viscosity change and wax starts to come out, close the bottom tap, the wax line should now be below the top chamber taps. Allow the contents that has just been drained too cool, any wax will solidify on top, this wax can be recovered and added to the next batch to be processed.
Note: Honey rich water is ideally used to make Mead!
Now move up to the top chamber tap, depending on the temperature that you have the unit set to, you may need to apply an electric hot air gun or hair drier to the outlet, this will allow any solid beeswax to melt within the tap. Use a small container to check if clean wax is coming out, if wax is still dirty allow to settle longer or drop the level further with bottom chamber tap.
Once wax is clean drain clean wax straight into a pouring jug or moulds until the clean wax is exhausted.
Repeat the process until all capping’s and old foundation have been used.
If there is a build-up of pollen or debris in the bottom of the chamber it is time to clean the unit out.
It is not recommended to clean brood comb in the unit as brood comb generally contains a lot of debris – specifically cacoons which can clog the tap.
Double Boiling Method explained
An electric double boiler means the unit has a water jacket around the outside of the product chamber providing a much larger heating surface, the water jacket protects the product from high heat that is produced by the electric element when it’s heating, the water jacket thermostat controls the heating process, once heated up product is placed into the product chamber and the heated water in the jacket melts/heats/emulsifies/separates depending on the product being used from the base and the sides to the desired temperature.
The product tap passes through the water jacket and is surrounded by hot water heating it.
Product is stirred periodically to stabilise temperature before pouring.
Product temperature is maintained by the water jacket thermostat allowing the user to spend time preparing for the final product.